Deploying a Django application to development server using Nginx
Share This Article

Table of Contents
Subscribe to Our Blog
We're committed to your privacy. SayOne uses the information you provide to us to contact you about our relevant content, products, and services. check out our privacy policy.
One of the main problems faced by a developer is hosting his application in a development server without the help of a Devops person. Developers will always have to depend on someone else to deploy their code to a development server.
In this blog, we will go through four scripts which will help developers to deploy their django application to a development server hosted in AWS EC2 ubuntu instance without any Devops help.
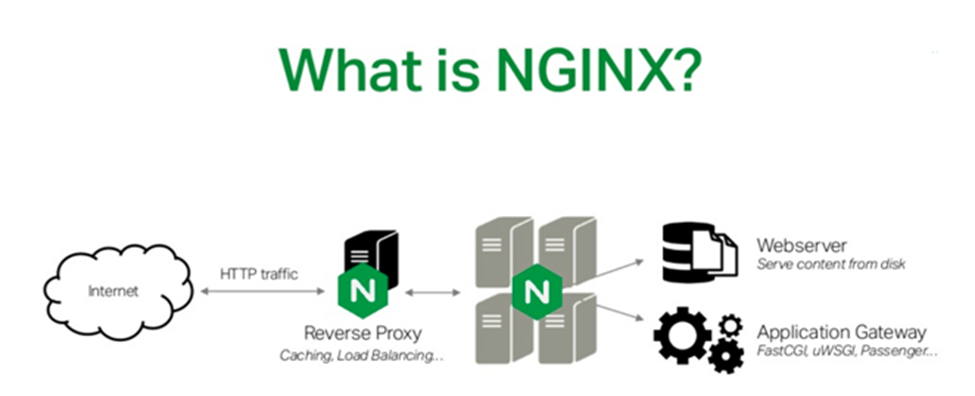
We will use Nginx as the webserver and uWsgi as the webserver gateway interface.
1) Firstly you need to setup a django application if you do not have one and create a uwsgi socket file.
django-uwsgi.sh (Create a file and copy the below snippet)
DEPLOYMENT_PATH='/home/ubuntu'
cd ${DEPLOYMENT_PATH}
virtualenv sample_env --no-site-packages
cd ${DEPLOYMENT_PATH}/sample_env && source bin/activate
pip install django==1.7.1
pip install uwsgi
cd ${DEPLOYMENT_PATH}
django-admin.py startproject sample
sudo apt-get install nginx
echo '[uwsgi]
master = true
socket = /tmp/uwsgi.sock
chmod-socket = 666
chdir = /home/ubuntu/sample
wsgi-file = /home/ubuntu/sample/sample/wsgi.py
virtualenv = /home/ubuntu/sample_env
vacuum = true
enable-threads = true
daemonize= /home/ubuntu/sample/uwsgi.log' >> uwsgi.inideactivate
- DEPLOYMENT_PATH : Specifies the location where the django application is created. You can edit this location and change it as required.
- First we create a virtual environment “sample_env”. This command is for python2.7, change it to python3.4 if required.
- The virtual environment is activated and the required python packages are installed.
- We will install uwsgi python package at this stage.
- We will then create a django application “sample”.
If you already have a django application you can skip the above commands for creating a django app and virtual environment from the script and execute it.
- The nginx webserver package is installed.
- Creates a file “uwsgi.ini”, specifies the configuration of uwsgi socket file that connects the webserver to our django application.
- socket: Location of the socket file to be created
- chmod-socket: Permission of the socket file created
- chmod: Project directory
- wsgi-file: Location of the django wsgi file
- virtualenv: Location if the virtual environment
- enable-threads: Run uwsgi in multi-thread mode
- daemonize: Location of the uwsgi log file
2) Next we need to configure the nginx webserver. Copy the nginx config file to the project directory and execute the next script
nginx.config
server {
listen 80;
# server_name example.com;
error_log /home/ubuntu/sample/sample.log;
location / {
uwsgi_pass unix:///tmp/uwsgi.sock;
include uwsgi_params;
}
}
When the script is executed the nginx config file is copied to the location “/etc/nginx/sites-available/”.In the nginx configuration we define default http port 80.
- The nginx logs file will be created in the location specified in error_log.
- The uwsgi socket location is defined inside the location module as “/tmp/uwsgi.sock”.
- If you have a domain name you can remove the hash from the line server_name add your domain name there.
3) Finally we need to restart the nginx webserver to reflect the changes in the web.
nginx-restart.sh
#!/bin/sh
DEPLOYMENT_PATH='/home/ubuntu'
. ${DEPLOYMENT_PATH}/sample_env/bin/activate
sudo killall -s INT uwsgi
uwsgi --ini /home/ubuntu/uwsgi.ini
sudo service nginx restart
- First kill the current uwsgi process (if any) to delete the current uwsgi socket file.
- Then create the uwsgi socket file
- And finally restart the nginx webserver
To execute these scripts, change their permissions such that these files are executable except for the nginx config file. For that, execute the following command in the terminal.
chmod +x filename.sh
To deploy your webapp local or any other server just change the location of the directory paths accordingly in the four scripts.
After executing these scripts you can check the browser with the server ip-address or your domain name and if you are using it in local, use localhost as domain name.
Please note that these scripts are just to host your web app in a development server, do not use them to deploy it in production server.
Share This Article
Subscribe to Our Blog
We're committed to your privacy. SayOne uses the information you provide to us to contact you about our relevant content, products, and services. check out our privacy policy.

